Converting a Philco Dial Lamp Assembly to an LED
By Bill Werzner
If you have ever been confronted with a deteriorated vintage radio dial lamp assembly you will understand where I’m coming from. This dial lamp problem was one I had to address in order to complete my restoration of a Philco tombstone model 610. The rubber insulating seat that secured the dial lamp in place had become so brittle with age that it cracked apart when I removed the lamp assembly to replace the badly deteriorated wiring. My first attempt was to refashion an insulated mount using heat shrink tubing and rubber electrical tape. Things looked good until I tried to install a replacement #47 bulb with bayonet base and the holding spring pushed over the center contact plate creating what would have been a short circuit between the plate and housing. Those original hard rubber seats were of a unique design that held the center contact plate in place to align with the lead button on the bottom of the dial lamp bulb. The coiled spring provided tension to push the plate against the center lead contact button for electrical contact. The specially designed rubber seat was to insulate the spring from contacting the center plate and shorting to the shell of the socket. A second attempt to reproduce an insulating “boot” also failed. Then I decided to try something new using a clear white LED for a dial light. I began by cutting a piece of 3/8” wood dowel rod about 7/8 inch long. Then I drilled a 1/4” diameter recession in one end about 1/8“ deep. Two parallel holes for the wires (one 1/16 diameter to accommodate the insulation sleeve and the other 1/32” for the ground wire) were drilled down through the dowel rod from the LED recession seat. An insulated wire was tack soldered to one wire and covered with small diameter heat shrink for insulation. The dowel can be moved up and down to adjust the amount of illumination on the dial. I soldered a 500 Ohm ½ watt resistor in series with the insulated wire to a 6.3 volt filament source for power and the LED produced excellent illumination for the dial. In this instance, the wood dowel fit snugly inside the metal cylinder and did not require a glue bonding to hold it in position. If gluing is necessary, a small amount of glue can be applied through the two small side openings where the original lamp pins were located.
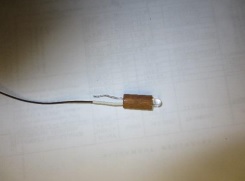
Clear LED mounted in dowel rod. Note heat shrink covered soldered connection. Bare wire will be soldered to lamp housing (ground).
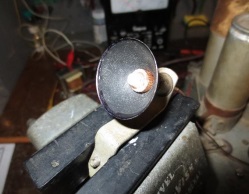
Completed LED dial lamp assembly mounted in reflector housing, powered up, and ready to install.